Frequently asked questions (FAQ)
Question list:
Installation
1.1) How to attach safety control box? What is the right position for ScB?
1.2) How to correctly stick SMARWI holder?
1.4) What if i failed to stick SMARWI for the first time?
1.6) Does SMARWI fit to my window?
1.7) Why SMARWI needs power adapter & does it work with battery?
1.8) I do not have a socket under the window or near the window. What to do?
1.9) I need to add SMARWI on another window then the one installed
1.10) When to use screws for fixing SMARWI?
1.11) Can I use SMARWI immediately after installation?
Everyday operation & control (Software GUI)
2.1) Why SMARWI does not respond to OPEN/CLOSE commands at vektiva.online?
2.2) Do I need to download application to control my SMARWI?
Other FAQs
3.1) Is it possible to control SMARWI with API?
3.2) Is it possible to connect SMARWI using IFTTT?
3.3) Does window closed by SMARWI holds with the same power as with the crank?
3.4) Are there any sensors in SMARWI?
3.6) Is there cigarette smoke sensor available?
Installation
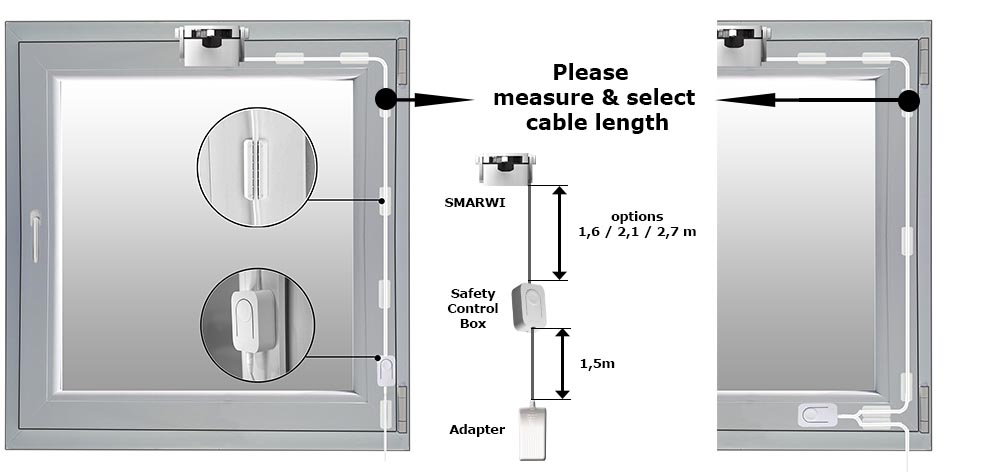
1.1) How to attach safety control box? What is the right position for ScB?
Think about where you put the security button. Decide whether you will stick the security box vertically along the hinges of the window or horizontally to the bottom of the inner frame. The BoB bottom part, which is detachable and connected to the BoB magnet, is intended to be glued. If the window opens directly against the wall niche, we recommend placing the BoB on the lower frame well away from the hinges so that it does not get damaged when the window is fully opened. Inside the ScB, you can shorten the cable by winding it to the required length.
1.2) How to correctly stick SMARWI holder?
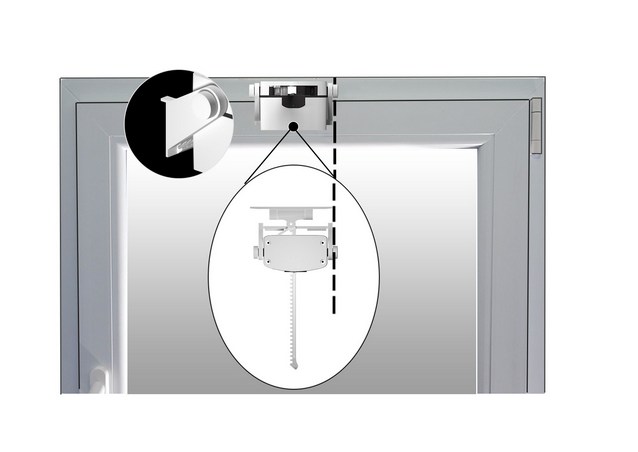
The right side of the ridge holder should be aligned with right side of SMARWI holder. This ensures that the ridge is perpendicular (90° angle) to the window frame when the SMARWI is glued. The slight deviation from the ideal 90° angle should be compensated for by the device design.
Beforeusing SMARWI for the first time, please start with calibration according to the instructions using the Settings / Calibration tab. Repeat the calibration as the first step if the window does not open, does not open to the desired ventilation distance or produces tapping sounds (pinion jumps on the ridge teeth) when closing. Generally, the calibration addresses the problems associated with setting the closed and open window position correctly. Changes in the geometry of your window may by caused by significant changes of outdoor temperatures. Also, in these cases, we recommend re-calibrating the window.
1.4) What if i failed to stick SMARWI for the first time?
If the SMARWI holder or ridge holder fails to stick optimally during installation, use a knife or similar tool to remove the badly attached holder and remove the remaining tape from the bracket and window. Use only a replacement adhesive tape kit for re-bonding. Tape replacement kit is available in the eshop. Glued surfaces must be degreased before re-bonding.
Window's security and function is the same as in normal ventilation mode without SMARWI installed. So if your situation does not allow you / you do not prefer to leave open ventilation in your absence, nothing changes, the window can be closed at any time and plans paused with one click. SMARWI is able to keep fresh air during your sleep, plan for ventilation in the baby room, help to open less accessible windows and much more, see examples of use.
1.6) Does SMARWI fit to my window?
SMARWI is designed to be installed on most windows with ventilation function (Tilt-Turn). However, windows and their specific fitting into buildings are very variable. Windows have different sizes, and they are planted in a wall with different depth of arch etc. Please take a look at the chapter What I Need to Know Before Buying. Checking your window parameters and choosing the length of the cable to the Safety control Box before buying will pay off.
1.7) Why SMARWI needs power adapter & does it work with battery?
SMARWI maintains set position for open and closed window using a holding current (motor fixation). Instead of the adapter, you can use the battery, but thanks to permanent holding current, battery life is significantly reduced.
1.8) I do not have a socket under the window or near the window. What to do?
The are two solutions. An electric socket extension cable commonly available in electro stores, or an extension DC power cord. An extension DC power cable suitable for SMARWI connection is available in our e-shop in different lengths.
1.9) I need to add SMARWI on another window then the one installed?
Do the same as if you did not manage to stick SMARWI correctly, see question 1.4.
1.10) When to use screws for fixing SMARWI?
Adhesive tapes supplied with SMARWI enable firm fixation of holders on flat, non-porous and degreased surfaces. If the surface of your window is too uneven, we recommend fixing holders using the screws included in the SMARWI package. Plastic windows or windows with a metal surface have a smooth, non-porous surface, so always prefer sticking. If required, fasten the ridge holder using the screws, twisting them through the openings on both sides of the holder. Attach the caps on fixed screws to hide them.
1.11) Can I use SMARWI immediately after installation?
SMARWI mounts on the window using high quality adhesive tapes with strong adhesion and durability. Adhesive tapes reach full force fixation within 24h from sticking. After sticking, wait for at least one hour, ideally longer before you you start SMARWI operation (opening and closing the window)
---------------------------- Připravujeme další FAQ v této kapitole---------------------------------
Everyday operation & control (Software)

2.1) Why SMARWI does not respond to OPEN/CLOSE commands at vektiva.online?
If SMARWI is active (control box is not grayed out and allows clicking on controls) and does not respond to your commands, refresh the page in the browser. An open browser may lose contact with vektiva.online server if opened for longer time.
2.2) Do I need to download application to control my SMARWI?
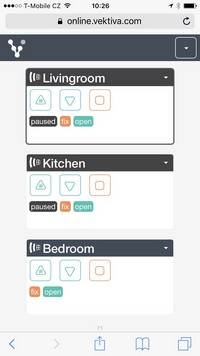
SMARWI is controlled via the Web, using an Internet browser on your mobile device or PC. No need to download any application and wait for its update. If you control SMARWI using local network without Internet access, just enter your IP address in the browser, eg 192.168.1.20.SMARWI has been designed for primarily for control through vektiva.online. In that case, just fill in the vektiva.online, log in or register and save this address on your phone's desktop. You can simply click on the icon on your phone's desktop to launch it online, and even if it's running in an Internet browser, it behaves just like application.
---------------------------- Připravujeme další FAQ v této kapitole---------------------------------
Other FAQs
3.1) Is it possible to control SMARWI with API?
SMARWI can be controlled using an API call. For instructions on how to use API calls, see the Tutorials (API Manual)
3.2) Is it possible to connect SMARWI using IFTTT?
Yes, thanks to APIs, SMARWI can be called via IFTTT using Webhooks. For IFTTT usecases, see Window voice control and Close windows based on weather forecast.
3.3) Does window closed by SMARWI holds with the same power as with the crank?
Windows and their sealing capabilities are quite different (depending on size, geometry, age, actual temperatures, etc.).
Closed window in ventilation mode fixed by SMARWI is not pressed as forcefully as when closed with crank, where fixation is done on several places of window frame. However, it is possible to achieve similar effect with combinations of two techniques:
A) In the Settings on the Finetune tab (for descriptions of individual items in the Finetune tab, see the Control manual), you can find a slider to set Window closed position finetuning. By increasing the value of this parameter, SMARWI will push the window to the frame more tightly. However, if it is set too tight, the ridge tooth may jump over. So it's necessary to finetune SMARWI closing to your specific window. It is also possible to increase the Closed holding power and Near frame power parameters. Properly set window is closing smoothly and holding tight. After change of parameters in finetune it is always necessary to test it by opening and closing.
B) Thermal efficiency of the window closed by SMARWI and minimization of draft can be further increased by the application of additional sealing.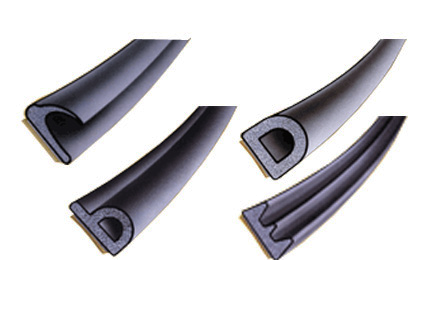
Sealing tapes are made of foam and rubber. Foam types are available in widths of 3 to 4 mm, and are used to seal small and medium gaps between window and frame. However, consider that this type of seal needs to be replaced after approximately 2 years.
Rubber sealing tapes have last longer and are available with different types of profiles. For windows with small holes of up to 3.5 mm we recommend a E-shaped profile. A seal with a P profile is suitable for sealing the middle gaps while D profile is used for large gaps. All seals have a self-adhesive surface and are available in hobby markets in several color variants (white, brown, black) and different pack sizes. Please note that in order to close the window with the additional insulation attached, it is necessary to use a greater force of pressure to the crank.
3.4) Are there any sensors in SMARWI?
SMARWI alone does not contain sensors for temperature, noise, CO2, and so on. If you need to control a window using SMARWI based sensors, it is currently possible to use third party products that can be connected to SMARWI via IFTTT (eg Netatmo meteorological stations and others) or who generally know how to control SMARWI using an API call (eg home system Fibaro and other). We are preparing our own set of sensors that we would like to launch by Q1 2019.
See question 3.4.
3.6) Is there cigarette smoke sensor available?
Unfortunately, at the moment, there ane not smoke sensors with sufficient sensitivity at a reasonable price, which in a timely fashion (like human smell), can detect cigarette smoke in your room. Existing sensors meeting these requirements are very expensive and large. However, we have already discovered a company that works on this and we will test the usability of their sensor and solutions.
---------------------------- We are preparing more FAQs in this chapter---------------------------------


